Thursday, December 17, 2015

Super Easy Elf on the Shelf Ideas

Because not all of us have time for the Elf!!


So after speaking with a few moms I know I'm not the only one who is frustrated over figuring out what to do with this elf! In the beginning I swore I wouldn't spend $30 on a "stupid elf". However my sister apparently thought my kids should definitely have an elf :) So last year this tradition began and my kids absolutely love their elf Morgen. Yes, I know how to correctly spell Morgen, but he's an elf so he's different. 

This year Mindy joined our family too (because I like to torture myself). Although it really isn't any more trouble to have two elves. Either way, most of us are INSANELY busy and don't have time for elaborate elf scenarios and I prefer not to have the elves "in my way", like rolling in flour on my stove. Um no. I'm not cleaning that crap up nor am I not using my stove for a full 24 hours. 

So here is a compilation of mom-on-the-go ideas that are super easy and not too mischievous, as I'd prefer not to encourage my munchkins, and will also be out of mommy and daddy's way!


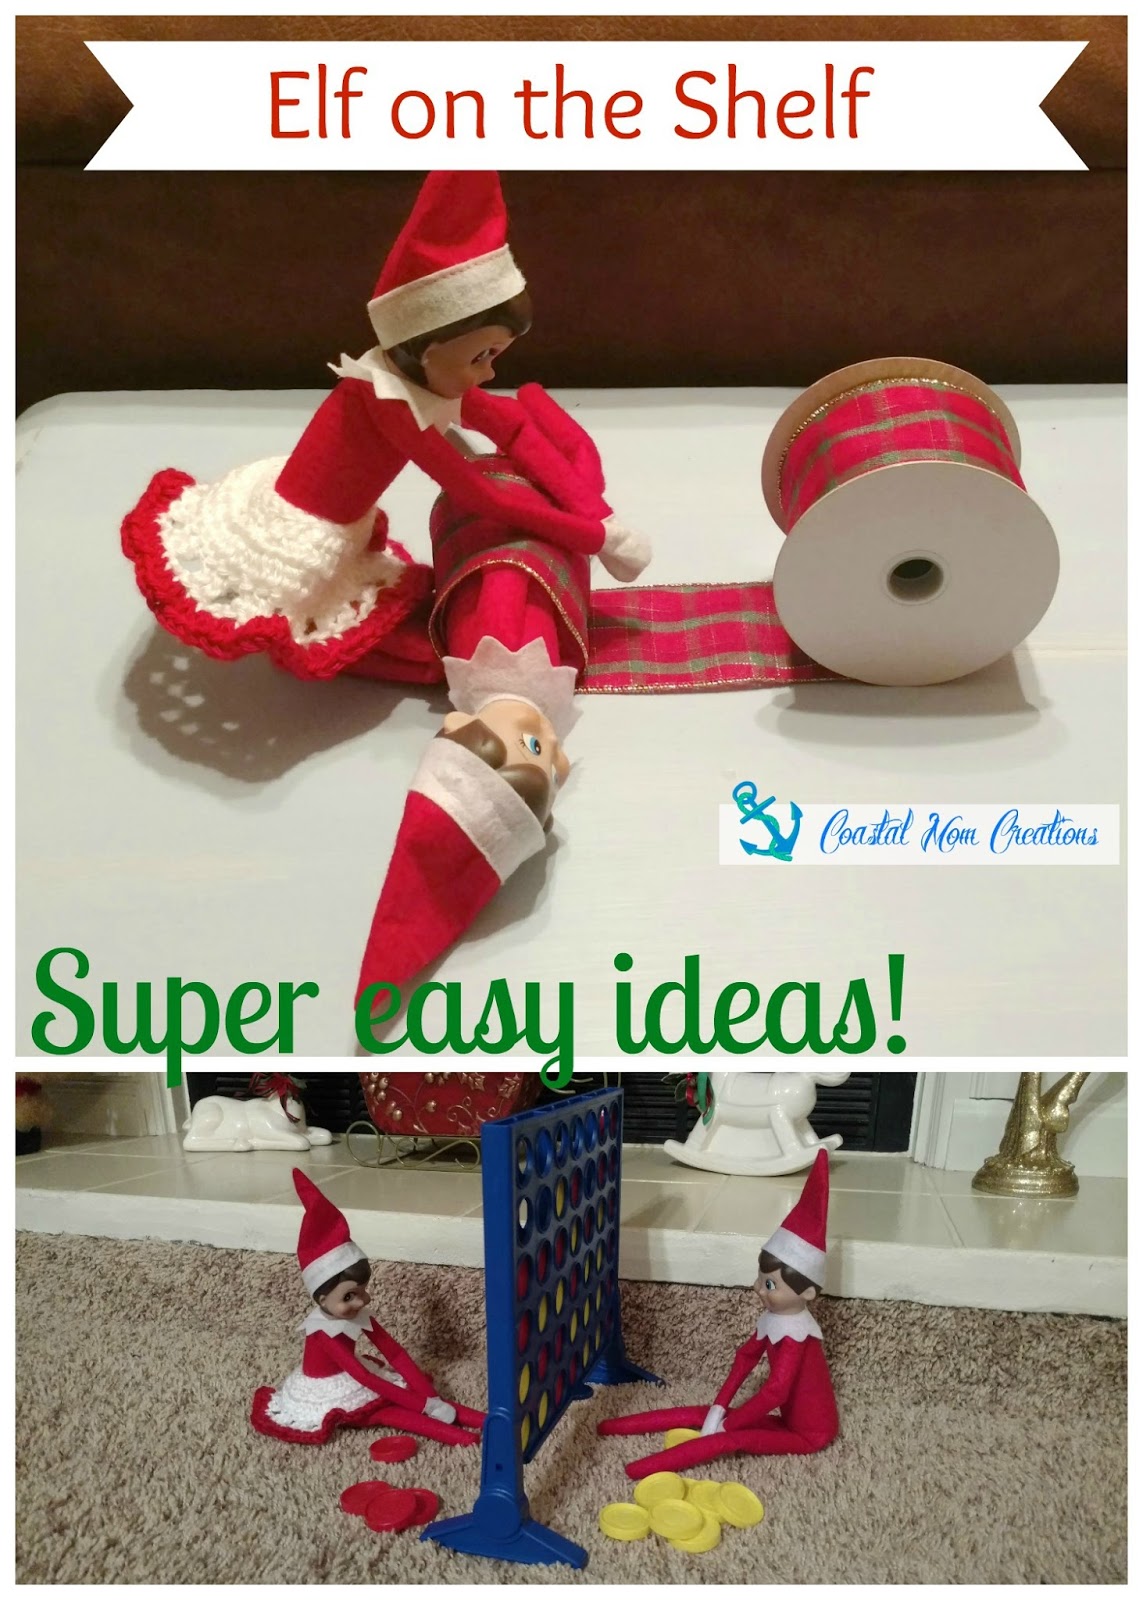
1) Rolling in Christmas ribbon:

Sunday, November 8, 2015

Distressed Cottage Desk


This desk makes me think of cool mornings by the breezy ocean coast, sipping warm green tea. Complete peace around me, just listening to seagulls and reading a book. 

HAHAHAHA....I wish. I'm currently listening to a medieval battalion attack the Bat Cave in the background while my daughter keeps interrupting me to help her with yet another rainbow loom bracelet. I'm ok with that though. It means they still want to be near me and haven't written me off yet. 

I purchased this desk a few months ago for $50. I got a second desk for $10 along with it and made over that one for my son's room here. I had intended to sell this desk but I think I may keep it.

This is what the desk looked liked beforehand. Not bad, but pretty scratched up. Not sure if it was done this way on purpose or not. 


Thursday, October 29, 2015

Homemade Angel Wings


After much debate over this year's Halloween costumes, my daughter decided to be an angel. Great! A white sheet, cut to fit, easy. Angel wings? How in the world do you make angel wings?? I of course Googled this. I found a site with instructions for DIY wings. I went and purchased 12 gauge wire and white pantyhose. The instructions said to shape the wire into your desired wings. The whole time I'm shaping this wire I am thinking to myself, this bends way too easy. How in the world will it hold it's shape with pantyhose stretched over it? But, whatever. The site had drawings and everything, so it must work. Well, my gut was right. The second I tried to put pantyhose over the wire it bent all out of shape....and I'm using my nice language on here. My daughter looked horrified and worried that I could not produce the cool angel wings she so desperately wanted for her costume. 

So after a few choice words and then finally back to logical thinking I decided...FINE...we need wire that doesn't bend? Easy. I have a closet full of stupid wire hangers that I can't stand! I pulled 2 hangers out of the closet and my daughter looked so skeptical and sad. She said that won't look good, it won't work. Wanna bet? Challenge accepted!!

I am going to be as descriptive as I possibly can. I did not take a lot of photos. I had no idea I would even blog about this until I was done and thought holy crap these look awesome!! So, here's what works in real life.

Items you will need:
2 wire hangers
Electrical tape (even duct tape would work)
Pipe cleaners (those little furry wire thingys for crafts)
White pantyhose (queen size)
White Christmas garland
2 feather boas
Hot glue gun
White elastic for the straps
Scissors
Wire cutters

Fall Mantel


I just brought out all my fall decorations again. I have made a few changes since last year's fall mantel. I sold my basket of ginormous ugly fruit, much to my husband's satisfaction. One day recently he drove me to Michael's, where all the fall decor was 60% off, and said go find new fall decor. He'd saved back a little bit of money just for this. How sweet. I bought 2 new scarecrows, one male and one female. Also picked up a cute orange basket and a couple bags of pumpkins, gourds, etc. I used a 20% off entire purchase coupon as well, which can be used even on sale items. 

I also plan to dress up my dining table a bit this year. I had my friend crochet a table runner and I hot glued fake fall leaves to the ends. I am currently working on painting a ceramic turkey to display in the center of the table. I love fall! It's my favorite time of year. My children are already excited about Christmas and they absolutely cannot wait until their Elf on the Shelf reappears this Thanksgiving night...

Tuesday, October 13, 2015

Carrot Cake Cupcakes


This is undoubtedly the best carrot cake recipe out there! I cannot take credit however. In my search for a classic homemade carrot cake I came across Sigrid's Carrot Cake. It's as easy as any store bought carrot cake mix, but homemade and way better! 

This is the 3rd year in a row that I've made this particular cake for my boss's birthday. This year however I chose to make cupcakes instead so it's easier to serve at work. This recipe does not give a bake time for cupcakes so I took a stab in the dark and guessed. 

Bake at 350 degrees for 20 minutes. Yields 30 cupcakes. 

I did not have enough icing to frost 30 cupcakes. I barely frosted 26 so basically the last 4 were carrot cake muffins. Breakfast. You're welcome. 

I chose not to mix in the chopped pecans since some individuals may prefer no nuts, like myself. I sprinkled half my cupcakes with chopped pecans. Personally I think the pecans sprinkled on top is more visually appealing anyway.

Easy peasy as my daughter says ;) 

Saturday, September 26, 2015

Boy's Desk with Ombre Drawers


I shopped around for awhile for the perfect desk for my son. He wanted a cool desk just like his sister's Zebra Desk. I came across 2 desks through a friend and bought this one for only $10! I gave him the choice of which desk he preferred and he chose this one. The other desk is my next project :) I asked my son what color he wanted and he requested blue. As usual I spent days thinking and pondering my game plan. When the idea hit me, I was immediately excited! The associate at Lowes wasn't too thrilled with my paint request and said he'd duck next time I came in lol. 

This is what the desk looked like beforehand.

Tuesday, August 18, 2015

Coconut Cupcakes


This is my first attempt at coconut cupcakes and I used my entire extended family as guinea pigs :) I do have to say upfront that I myself do not like coconut and during my time in the kitchen I felt like I should be at the beach with coconut sun tan lotion! My husband was my taste tester and gives his seal of approval. 

I found this recipe at Cupcakes and Kale Chips and decided I'd give it a try and surprise my father-in-law. You can print off her full recipe and instructions. I changed 2 things with my recipe and I mention them below.

The cupcakes have a nice little surprise inside - a sweet coconut filling! I used a jumbo frosting tip to insert into the middle of my cooled cupcakes and gave them a twist to remove part of the cake.


The first thing I changed in my recipe was to chill the filling I made while the cupcakes cooled. In my opinion the consistency was easier to work with and less "watery".


When I added the filling I did this one cupcake at a time since you have to replace the small piece of cake you removed over the filling.

The second thing I changed was I decided to roast some shredded coconut in my oven (follow directions on package) and sprinkle on cupcakes when cooled. Everyone loved the coconut cupcakes and surprisingly it's not an overpowering flavor with all the coconut added to this recipe. This recipe is pretty easy and I would certainly repeat for future occasions! 

Wednesday, June 17, 2015

Tween Zebra Room Makeover

ROOM REVEAL

FINALLY done with this tween room! My little girl is growing up and she wanted nothing more to do with Scooby Doo or her Barbie house. She also discovered she was female finally and requested a pink zebra room. If you've read all my other posts about her room you know the story :)

Without further ado here are the before and after pics of her room!


I did have a frame for her bed, but I started painting it prior to taking before pictures of her room. Then, we decided to upgrade her to a queen bed since she was getting so tall. I bought her energy efficient zebra curtains from the Wal-Mart website and hemmed them to a proper height for her room. I picked up new fashionable curtain rods at Ross. WAY cheaper than even Target or Wal-Mart. You can click on my links for the nightstanddresser and headboard to see how I redid those.

Tuesday, June 16, 2015

Tween Dresser Makeover


The last piece of furniture is finally done in my daughter's room! I am so glad too. This year is flying by already and I've had little time to dedicate to finishing her room. It's time for a break!

This dresser is a home store find we got for $65 a few years ago. It's laminate and not real wood anywhere! So if you sand this before painting, you'd end up with either of two results:
1) Lightly sanded for nothing because the surface is still as smooth as a baby's butt or
2) Break out the sander to cut through and roughen the surface and you end up sanding the entire laminate surface off down to the cheap MDF underneath.


I have done this before when I thought a piece was "real wood". 

All is not lost though. You can still have beautiful results on laminate furniture. The secret is priming! I use Zinsser Bulls Eye 1-2-3 Primer.

Monday, May 4, 2015

Strawberry Buttercream Frosting


I can't even begin to describe how good this strawberry buttercream frosting tastes! I only recently learned how to make it and I've read several different recipes online. The consistency of the frosting was a bit hard to master. I have no idea how others got their frosting to look so pretty and not be watery from the pureed strawberries. So I tweaked the recipe to my own version, without jeopardizing the taste a bit!

Ingredients:
1 stick unsalted softened butter (not melted!)
1 stick salted softened butter
4 cups powdered/confectioners sugar
1/2 tsp of vanilla extract
3/8 cup of strawberries (pureed)
Pinch of salt

Monday, April 13, 2015

DIY Dark Wax


Have you ever wanted to try dark wax but can't find it anywhere? Or you just can't see paying a ton of money for it? Well that was me. So I researched to see if you could make your own. Indeed you can! I found a great video tutorial on tinting wax on YouTube.


So I gathered my supplies, Minwax Paste Finishing Wax and Rust-Oleum wood stain in a very dark color called Kona. I scooped out a bit of wax, as shown in the video tutorial, and melted it down on the stove on medium heat. Remember to add a bit of water in the pot.


Once the wax is melted remove from heat. I added 2 Tbs of wood stain to the wax and stirred thoroughly. Let it sit until it hardens once again. You're done! 

You can add a little less or a little more stain, depending on how dark you want your wax. I've also read you can use a black oil based paint to tint your wax as well. Just be sure to use oil based products. 

I used my dark wax on a nightstand to age it. Below you can see before and after applying dark wax. Check out how beautiful the nightstand came out here!

I keep my dark wax stored in a mini mason jar. I can't wait to use it again on another project!

*UPDATED TIP: After months of storage I found my wax to be very hard and almost impossible to work with. I thought all was lost until I tried this...Scoop out a dollop of your dark wax and a dollop of soft clear wax (I used my SC Johnson paste wax). Smash it together and mix really well. It will blend together nicely and your dark wax will be just as smooth as it was originally. I was so glad this worked for my Faux Fireplace project!


Friday, April 10, 2015

How to Distress and Age with Dark Wax


To start off, this nightstand was the first piece of furniture specifically redesigned for someone else. All my other furniture pieces have been for my home. Melanie, my good friend and colleague saw the post I did on my daughter's nightstand and said "I want one too!" How honored I felt that someone would request a furniture piece redesigned for them! So the search began for the perfect small chest to turn into a nightstand with shelves.

This is what we found :) Perfect right?


We discussed her style and wants; dark top, light colored bottom, loves the distressed look and 2 bottom shelves. She pretty much gave me free reign over her piece and said have at it! What trust!!

I thought long and hard about what to do...the pressure was on. I decided to attempt a couple things I haven't done before. Apparently I like a challenge. My husband could not understand why on earth I'd attempt new techniques on someone else's furniture. Well, that's easy. If I didn't think I could do it, I wouldn't :)

Wednesday, April 8, 2015

How to Make Your Own Chalk Paint

Well most of us know there is a craze about chalk paint. I really wanted to try this out as well. For those that don't know, chalk paint is very different from "chalkboard paint". Do not confuse the two. Chalk paint is supposed to be very versatile, no priming or sanding is required and can be used on almost any surface. It has a nice velvety matte finish that you can add a soft wax to for protection and durability. The original Annie Sloan Chalk Paint is quite expensive and I'm sure it's worth it. I've personally never tried it since it costs over $30 for just a quart. So, like many other budget friendly folks, I decided to make my own!

There are many tutorials on Pinterest or Google for how to make your own chalk paint. Some recipes differ. I chose to make mine as described on the Lowes website. 

What you'll need:


1) Measuring cup
2) 1/3 cup Plaster of Paris
3) 1/3 cup water (some say warm, some say cool) I used cool
4) 1 cup latex paint
5) Stir stick or something cool like a plastic knife leftover from a Frozen party :)

I read many tutorials on how to make chalk paint. Most seemed to use Plaster of Paris, which I already had so I went that route. The sample paint at Lowes is exactly a cup so perfect for small projects like this!

Mix 1/3 cup of Plaster of Paris and 1/3 cup of water. Stir until smooth. Mix in 1 cup of latex paint and stir thoroughly.

Friday, March 27, 2015

Easter Banner & Decor


I definitely cannot take credit for this super cute Easter banner. This was all my sister's idea. She swears she's not crafty. I beg to differ. But, she was completely delighted with herself when she created this Easter banner for her photography backdrop. Check out her Southern Reflections Photography Studios Facebook page HERE. I was so excited when I saw her banner, I just had to have the same one for my mantle! Being that she's such a wonderful sister and all, she mailed me her leftover supplies :)

The best part about this banner is how cheap it is to make! All you need are Easter gift bags, twine, scissors and a single hole punch. She found the Easter gift bags at Fred's for 25 cents each.


Cut off one side of the bag and hole punch both corners. Run your twine through each and voila!


My other Easter decor was ALL from the Dollar Store. How cool is it that they sell glass vases, votives?! As you can see, a very easy and cheap way to decorate for the holiday!


Tuesday, March 3, 2015

How to Update Fireplace Tile


In the past I have posted my fireplace makeover however I did not really focus on the great tile update. Without this piece of the puzzle, the fireplace would not look near as great as it does now. This is the part of the fireplace makeover that I'm most proud of and I want to share this with you. 

There are others out there who have ugly outdated tile (you know who you are) and I want you to know, you can change all that in an afternoon.

Maybe your fireplace is still beautiful but the tile just needs a facelift. 

Maybe the whole facade is terrible and you want a drastic change as I did.

I did a little research before I attempted to paint mine. I thought I was the only crazy person who considered painting her tile. I was wrong thankfully. I'd love to go back to Lowes and show this picture to the guy that looked at me like I'd lost my mind. Why haven't men figured out we're always right yet? It's baffling.

Thursday, February 26, 2015

Frozen Birthday Party


Where to begin with this one...?! This was by far the most extravagant birthday party I have ever had for one of my children. This was my version of a Pinterest-y winter wonderland on a budget, for my daughter's 11th birthday. It's not as nice as some of the elaborate parties I've seen on Pinterest, but hey we can't all be rich ;)

THE most important thing about your child's party, is YOUR CHILD. Having 20 friends over and throwing a block party, like you see in every movie, is not my daughter's personality. Having a couple close bff's over to spend quality time, is more her speed. Once all the grandparents, aunts and uncles arrive you have a house full anyway. 

I compiled all the ideas I had researched and made my game plan. I used blue and white plastic tablecloths to decorate with. My daughter made snowflakes out of coffee filters. I bought any serving dishes I needed at The Dollar Tree or Party City for $1 each. The tumblers were a great clearance find at Target thanks to my friend, Melanie!

Giving all the food Frozen inspired names seems to be a popular Pinterest pin. We incorporated that into our theme as well. Two food items we added were Kristoff's Ice Blocks and Hershey kisses. I did see a bowl of blue jello with an "Olaf floating" on top and I almost did that but instead decided to cut the jello into cubes for ice blocks.

FROZEN Themed Food:
Kristoff's Ice Blocks - Blue jello
Olaf's Snowman Arms - Pretzel sticks
Elsa's Icicles - Rock candy
Sven's Carrots - baby carrots
Elsa's Snow Dip - Ranch dressing
A Kiss to Melt a Frozen Heart - Hershey kisses
Blue Party Punch - courtesy of Comfy in the Kitchen

Wednesday, February 11, 2015

52 Things I Love About You


With Valentine's Day just around the corner, I thought I'd share this special project I made a couple years ago for my husband for Valentine's Day.

I found the tutorial and idea at Visual Heart. She even offers a template you can download and add your own text. 

To start with you have to come up with 52 reasons you love them! I used some of Visual Heart's ideas, but mostly I added what I felt I needed to say and what was special in our relationship. 

Because I always have 2,873 tabs open in my mind, I have to write it down and organize my thoughts. I'm old school and still put pencil to paper. I used Microsoft Word and created my own template and typed them up. I chose to use rubber cement instead of Mod-Podge and it worked great. I found the binder rings at Michael's.

My husband really loved this gift. It's from the heart. It's made from your hands and not bought in a store with someone else's words.

As I type this..... he leans over and says aww you made one like that for me! Yes dear, this IS yours. Haha....

Wednesday, February 4, 2015

Canvas Silhouettes


I saw the idea for canvas silhouettes of facial profiles in a brochure from Lowes or Home Depot, can't remember which. I thought what a cool idea this would be to incorporate into the Tween Zebra Room?! My daughter is in love with all animals, esp exotic or wild animals; i.e., lions, tigers, zebras, wolves. 

The brochure had a very brief description of how to make a silhouette using spray paint: spray paint the canvas 1 color, lay down your silhouette and spray over it. Tada! Sounds easy enough right? Not. So, through trial and error I came up with my own way. 

I followed their short, indescriptive directions initially. I had no idea how to make the silhouette stay in place without blowing away with the first spray. So I thought to myself...painters tape. I put a little underneath the silhouette I had cut out and sprayed away. This was my result :(


Plenty of over spray AND you can see were the painters tape had been holding down the ears.

Disappointed, I stopped there and finished up other projects. I told my husband about my dilemma and he suggested weighing the image down AND I figured out how I had so much over spray initially. So here's my step by step instructions on what worked for me.

Sunday, February 1, 2015

Zebra Desk Makeover


One more down. One dresser to go. Almost done with the Tween Zebra Room transformation. I will be glad to finally breathe a sigh of relief when it's completed. I plan to have the entire room painted and redecorated by February 13th. Thanks to the help of my husband we will meet that deadline!

This desk makeover turned out fabulous! The look on my daughter's face when she saw the stencil results makes all this hard work, worth it. I can't wait to see her face when the walls are painted and everything is moved back in. Oh I should video that!

Saturday, January 24, 2015

FROZEN Mason Jar Candles


Coming up next month is my daughter's Frozen birthday party. I have many things I have to make happen between now and then, including completing her Tween Zebra Room, since she has pleaded for it to be finished so she can show off to her friends ;)

To kick off the Frozen party crafts and decor, I created these Frozen mason jar candles. I got the idea for mason jar candles at www.thefrugalgirls.com. They created some very cute jars for winter decor. I just needed to incorporate a Frozen theme...simple!

I don't have a die cut machine as used by The Frugal Girls but they also suggested stickers. I found these glittery blue letters at Michaels on clearance for 99 cents. Score!

Items you'll need:

Mason jars
Epsom salt
Letter stickers
Tealights
Ribbon

This project only took 10 minutes and they look so good! In my opinion, the stickers are the way to go. First off, it's super easy! Second, you can interchange the quotes and ribbons for each season. I may just keep them up and change them when this party is over. Another reason I like using stickers - I am not fully committed to my mason jars having the same lettering on it forever lol. I am stingy with mason jars and I like being able to reuse them :)

What quote or saying would you put on your mason jars?