

To start off, this nightstand was the first piece of furniture specifically redesigned for someone else. All my other furniture pieces have been for my home. Melanie, my good friend and colleague saw the post I did on my daughter's nightstand and said "I want one too!" How honored I felt that someone would request a furniture piece redesigned for them! So the search began for the perfect small chest to turn into a nightstand with shelves.
This is what we found :) Perfect right?

We discussed her style and wants; dark top, light colored bottom, loves the distressed look and 2 bottom shelves. She pretty much gave me free reign over her piece and said have at it! What trust!!
I thought long and hard about what to do...the pressure was on. I decided to attempt a couple things I haven't done before. Apparently I like a challenge. My husband could not understand why on earth I'd attempt new techniques on someone else's furniture. Well, that's easy. If I didn't think I could do it, I wouldn't :)
To begin with I wiped the nightstand down, checked for cobwebs. I removed the drawers and pulled out the plastic guides on each side for the 2 bottom drawers using a small flathead screwdriver.

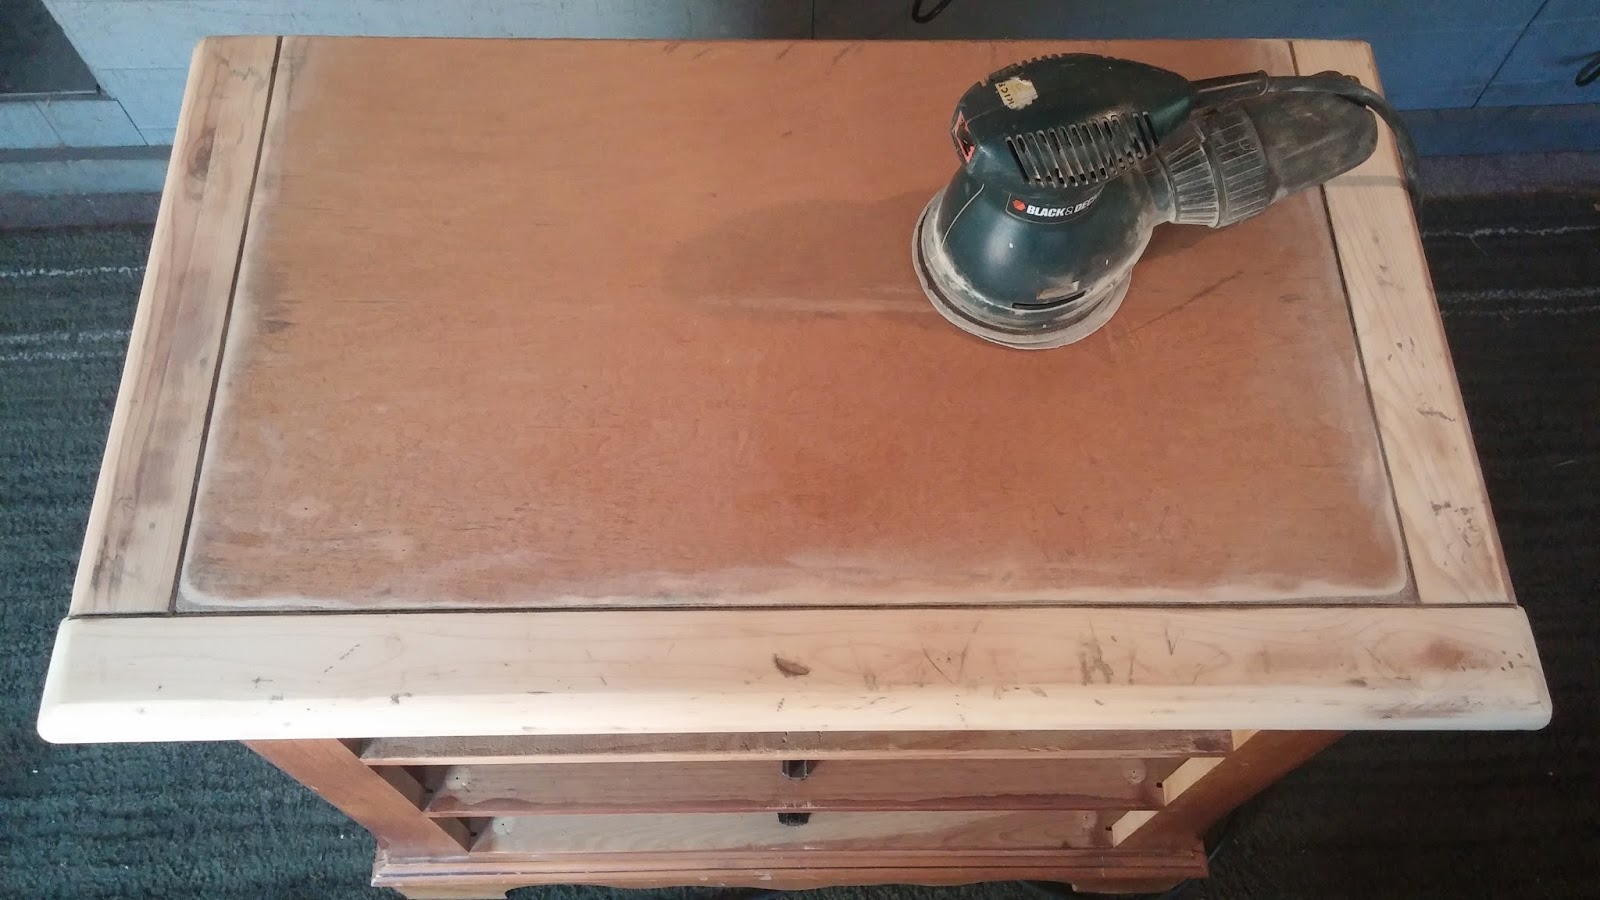
Next, I sanded down the entire top. My plan was to stain the top a beautiful, very dark color but upon sanding I discovered the entire top piece was not real wood. UGH! So, guess I'm painting it. Bummer. I had my heart set on staining.
Hubby ran by Home Depot for me and picked up some dark brown paint chips. With Melanie's approval we chose a dark brown called Bear Rug :)

The rest of the nightstand I did not sand. I made my own chalk paint for the first time. I chose an off white color called Cream Delight. For my chalk paint tutorial click here.

I applied 2 coats of chalk paint and dried in between. You cannot reuse chalk paint so this all had to be done in the same afternoon.


I am very pleased with how well the chalk paint covered, especially with no priming or sanding.
Now the fun part! Distressing! I have never actually distressed furniture before. I have however on small items, such as picture frames. It's really not hard. I used a 3M sanding sponge in medium grit. Any coarse sanding block or paper will work. Some have even used steel wool. Just do not use a fine grain.
Sand off the paint in areas that would show wear over the years. Distress as little or as much as you want according to your preference for that piece. Follow the grain of the wood. For example you would not want to sand off paint horizontally on the sides of the nightstand.


Now for the top! I primed the top with Zinsser before I painted it. I used 2 coats of primer, drying in between. Then I applied 2 coats of my Bear Rug dark brown, always allowing full drying in between.


Since I did not want the expense of Annie Sloan Soft Wax or Dark Wax, I knew there must be other products available for us more frugal gals. Minwax Paste Finishing Wax is one of many that you can use to wax your furniture. That's easily obtainable at your local hardware store so I picked up a can. One of the tips I read, thankfully, from Helen Nicole Designs was that Minwax can leave an orange tint on white furniture. What? Ah! Thank goodness I had not started. So guess I'll use that Minwax for something else. I took Helen's advice and bought SC Johnson Paste Wax. It was cheaper too!

The video tutorial that helped me the most was from The Purple Painted Lady.
Before you ever apply dark wax to age your piece you MUST apply a full coat of clear wax first. If you don't the paint will absorb your dark wax and look funny and you won't be able to rub it off. You will end up having to sand it down and start over.
I worked in 12-16 inch spaces and applied the clear wax as instructed. I used a cut up t-shirt as my rag to wipe away excess wax. I bought myself a nice tool of the trade, a wax brush. I had to be official haha. I purchased mine from Southern Honey Texas. I paid $20 with shipping. Not bad at all considering some of these brushes run over $50. I tried my best to invest in one that wasn't so pricey, but at the same time, not cheap junk.

I waxed the entire piece, except the top, and also the 1 drawer we were keeping. Since it's clear you can't really tell a difference in the photos.
Now here you have 2 options according to bestfurniturepaint.com. 1)Apply your dark wax shortly after applying the clear wax or 2) if you need more time, as I did, wait a day for your clear wax to cure and come back the next day/night. **However, if you decide to wait, remember you must apply a thin coat of clear wax prior to applying dark wax, so you have a moist layer to work with.
If you don't want to age/antique your piece you could stop here. Since I wanted this piece to look aged I applied dark wax the next night.

Now where did I get dark wax did you say?? Well....I made it! Click here for my DIY dark wax tutorial. Once again, frugal me needed a way to obtain dark wax without breaking the bank. So I Googled it. Tada! It was pretty easy. But at the end I felt like I had accomplished a major science experiment. It worked! I showed my husband just how smart I was, since he gave me those weird side long looks of what the h$#% are you doing??? Just let this genius work, please step aside. Thank you :)
I applied the dark wax the same as I did with the clear, working in sections. I used a clean rag to wipe away excess wax, making sure not to wipe it completely off or away from grooves and crevices. You want the dark wax to get inside corners and detailed wood work. See how the drawer now looks older?

I applied my dark wax over the rest of the piece, working in sections. In this photo I had not wiped away excess wax yet.

Be mindful of HOW MUCH you're putting on and wiping away in each section. I did the left side first and worked my way around. After I applied dark wax to the right side and stood back and looked, I realized one side of the nightstand was darker than the other. Ugh! So I had to apply more to the rest of the piece quickly to even it out, including the drawer! I tried wiping more away from the one side but it did not cooperate.
Still it turned out great looking. But I wasn't done yet!

Now, for the knobs...hmmm what would look good? I pondered on this the entire time I'd been working on it. I decided to attempt antiquing the knobs myself. I checked out some how to's on my phone and found one that said paint the knob gold, let it dry then apply your secondary color and wipe off while wet.
So I spray painted the original black knobs with gold spray paint I had on hand. The next day I applied some blue latex paint I had on hand as well. Then wiped it off with a rag. Boom. Easiest thing I did for this whole makeover lol.


Time to make shelves! This is where having a husband who's handy is a huge benefit. We removed the thick cardboard backing. It's much easier to install shelves this way and I wanted the backing replaced since it had a hole. Make sure you feel for any staple remnants so you do not cut yourself and if you're replacing the backing it will be flush to your furniture and not leave a gap.
I removed the 2 bottom drawer tracks. These are sometimes good to hang on to in case you need to replace one. The top track I planned to keep but it was warped so I removed it and replaced it with a straighter one from one of the bottom drawers.

After my husband measured the middle and bottom drawer spaces I painted the inside. I knew you'd be able to see the sides and back so everything that would show needed to be painted. I had some pretty blue latex paint already on hand that would look great in my friend's bedroom.

Using a yard stick the measurements were drawn out on a 5mm panel of pine. You can use birch as well. I recommend birch because it was easier to work with, but a little more expensive. My husband recommends pine, because he's cheap lol. The pine split a lot when cut so it made the edges pretty rough. A lot more sanding was involved. We bought a 4 foot piece of birch initially and thought we'd have enough for both shelves, but turns out we didn't. So hubby returned to Home Depot and bought a larger piece of pine that time and it was enough to make the second shelf and the backing too!


Make sure the nicest edge is facing forward. You don't want a rough looking edge to be what everyone sees!

Here's one of our cut shelves ready to go in.

Now you could get lucky and have zero issues sliding your shelf in. We had none when we made shelves for our daughter's nightstand. But these shelves? AH! We determined that the sides of the nightstand must not be perfectly straight because the shelves were definitely cut straight. It was a very tight fit and we had to keep going back and sanding the edges down in areas that were too tight to go in.
Once that was done and we got the shelves in, we used wood glue and clamps to hold them in place. You need a secure tight seal. See the edge where it was cut? Not pretty if it was facing forward!

Use something in between your clamps and your shelf so you don't damage it. We used leftover trim pieces that we'd kept.

Have paper towels or rags handy to wipe away the wood glue that oozes out once you clamp down. It will continue to ooze out for a bit. Keep watching it. Now take notice in the above picture. Since I was painting the entire inside, I didn't want to get any on the nightstand and run the risk of messing up my chalk paint and wax job! So, I painted the very edge of the shelves BEFORE they went in.

Both shelves in and everything clamped and secure. We had no way of clamping the front bottom, as you can see, so my husband cut up some leftover trim just tall enough to wedge tightly in between. Pretty smart he is! You can even use heavy objects to help weigh it down.

Leave your clamps on and let it sit for 24 hours. In the meantime, we measured and cut the backing. I painted 2 coats of the same blue latex paint on the side that would face forward.

Because we had issues with the shelves fitting perfectly, we ended up with small gaps here and there. Just run a bead of caulk along your seam on each side and run your finger over it in one swipe to smooth it out. My husband did that about the same time we clamped everything down, so it could dry at the same time and not hold me up from painting the next day.

The next evening I removed the clamps, taped off corners and painted each shelf on the inside. I applied 2 coats of blue latex paint.

The next day I applied 1 coat of polyacrylic to the shelves. The dry time on polyacrylic is at least 2 hours so that's all I did that evening! The next day I came back and sanded each shelf with a very fine steel wool pad. Then applied a second coat of polyacrylic.

I also applied 3 coats of polyacrylic to the top. Since I only work at night on projects it took me 3 different nights to accomplish this lol. In between each dried coat of polyacrylic, sand it lightly with the very fine steel wool pad. Taking these extras steps of sanding in between will leave you with a very smooth surface once you're done. After you apply your 3rd coat of poly, leave it be and do not sand. I always use 3 coats on the top surface of furniture. It will usually get a lot more wear than any other part of your furniture. We then nailed the backing into place with wood nails.

I couldn't be happier with how this piece turned out. Especially since I had not tried a few of the techniques before. The ultimate say so though was Melanie. My husband said don't worry, if she doesn't like it then you have yourself a new nightstand! HA! Great way to look at it!
When I took the nightstand to Melanie she exclaimed, "Oh Chris that is gorgeous!" I can still hear her voice in my head. I was elated!! She said it was exactly her style. I couldn't be happier.
I think this post took as long to write as it did to redo that nightstand, sheesh! If you have any questions feel free to contact me. In the meantime, I need a break! .....Oh right, I'm a mom, we don't get breaks....
Beautiful piece
ReplyDeleteThank you!
ReplyDelete