Wednesday, December 14, 2016

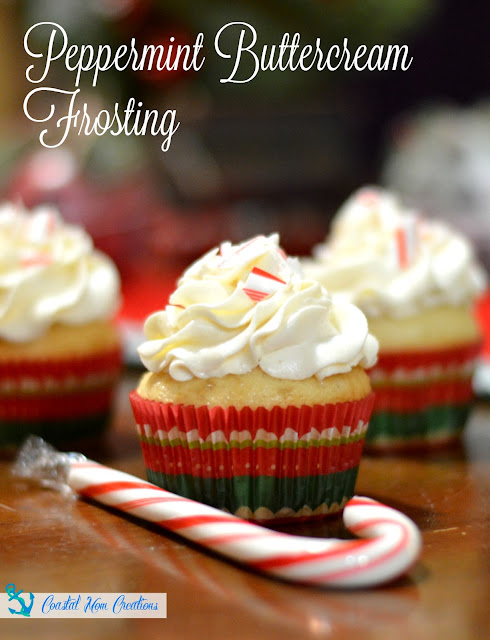
Peppermint Buttercream Frosting


This recipe is so simple and so good. This is my first time making a Peppermint Buttercream and I must say, I will definitely be making this again before the holidays are over! 

I made a Classic Vanilla Buttercream recipe, which I have a link to here. There is also a link for Chocolate Buttercream as well. I bet the peppermint would taste great with the chocolate too!

The only addition I made to the vanilla buttercream recipe was 2 drops of Peppermint Essential Oil. That's it! This is my first time using an essential oil in my baking. I will definitely have to venture out of my comfort zone more and try other oils. 


To top off my cupcakes I took a few candy canes and put them inside a Ziploc bag and crushed them with a rolling pin. My daughter had a lot of fun helping with this part!


There you go! A very easy, but festive holiday dessert that is sure to impress. 

Thursday, December 1, 2016

Faux Fireplace


I know this is pretty unconventional, but I certainly didn't want to waste a good piece of furniture. This is an old mirrored shelf from an outdated dresser. I bought the dresser to makeover, which is still on my "to do list". These old dressers usually sell better without the bulky mirrored shelves. I originally considered turning this piece into some type of foyer storage shelf with hooks for jackets and coats. I even saw someone on Pinterest who turned hers into a hutch on the wall. Nice! I felt this piece was too heavy for a wall though. 

It is the perfect size for a fireplace however! In the deep south we really do not have the need for a fireplace, yet they are so pretty to decorate with. I love my fireplace just for it's facade. I rarely actually utilize it though. So, I assume others out there would find this faux fireplace convenient. Nice soft glow of fire, without all the mess, and a mantle to decorate!

In all the excitement, I forgot to take a "before" picture. This is as close as I got. I barely started so we'll say it counts. As you can tell I had already removed the mirror. We'll get to that in a bit. 


I used Glidden Antique White latex paint. I found this ready made color in a sample size at Walmart. I had no idea they sold premixed colors! 

Wednesday, November 30, 2016

Vintage Nautical Dresser


I discovered this vintage dresser at a local estate sale. I had been keeping my eye out for something exactly like this for my husband. Frankly, I'm tired of sharing my dresser :) I bought this piece for $50, which I believe is a very fair price for it's age and condition. It is solid wood and has the dovetail drawers. Nice!


Here is what this little gem looked like beforehand. Built tough, but ugly. This project was a little more difficult than most since I had to consider someone else's opinion on the piece. My husband asked for green and chose his own color, which I agreed with. However, we did not come to a consensus on how to redo the drawers. It took some trial and error (and disagreements) till finally I said I know exactly what to do, you'll love it. Just trust me!

Saturday, September 3, 2016

Girls Pink Ombre Desk


I had a friend cleaning out storage and I bought this desk for $20. I knew immediately what I wanted to do with it. I had such positive reviews of the Boy's Ombre Desk that I thought it might be nice to redo this desk for a girl. I really like how my Cottage Desk turned out though, so I decided to paint this desk with my homemade chalk paint. 

Monday, July 11, 2016

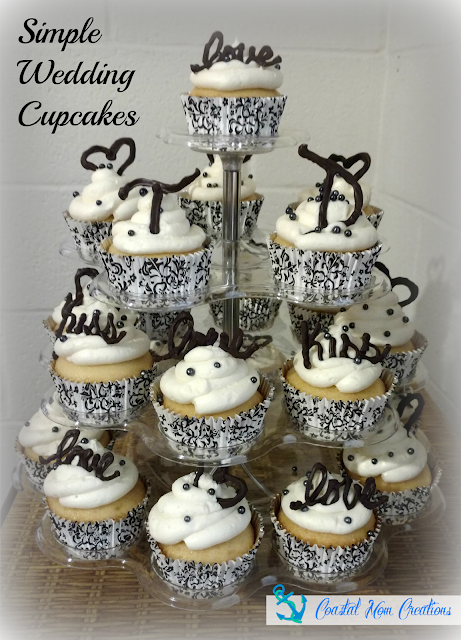
Simple Wedding Cupcakes


This is the first time I ever made wedding cupcakes. I just needed to come up with something simple and easy to commemorate a special newlywed couple. My daughter and I did lots of Pinterest research and we saw the idea of using piped chocolate decorations. 

To keep this super simple we made a vanilla box cake and our "go to" favorite Classic Vanilla Buttercream frosting. I alternate between the vanilla and chocolate all the time and absolutely love them. Check out the Turkey Cupcakes we made for Thanksgiving and you'll find the buttercream frosting recipe links on that page. 

We bought Wilton's Dark Cocoa Melts to pipe our words onto wax paper. Follow the instructions on the package and place your piped chocolate words into the fridge for 5 mins to set. This was extremely easy even for a beginner like me. I can definitely see lots of future cupcakes and desserts utilizing candy melts. I spent the extra $4 for Wilton's disposable candy melts bags. Throw the candy in the bag and follow the directions for melting, then snip the tip and pipe. No mess.


Use a jumbo tip to pipe on the buttercream frosting on your cakes. We bought black sugar pearls at Michael's and sprinkled them on. Lift the piped chocolate words from the wax paper using a frosting spatula and place on your cupcake. 

Viola! I still need some practice to make my chocolate words and hearts flow smoother but not bad for a first time. We even made two monograms, "T" and "D" for the groom and bride. Displaying your cupcakes on a stand always enhances the presentation as well! 


Saturday, January 9, 2016

Zebra Chair Makeover


I originally made over this chair months ago for resale, which you can see here. After I finished my daughter fell in love with it and claimed it for her own. I bought it for her originally, but she didn't think she'd want something without wheels so I ended up redoing the chair differently. However, once she saw the finished product she realized how pretty the chair could be. Gee, this sounds familiar....she did the exact same thing when I made over the zebra nightstand for her room.  

This quick change didn't cost me much except time and about $6 in new fabric. My daughter doesn't like distressed furniture so I repainted over it with the white I already had on hand from her Tween Zebra Room Makeover. I did a bit more research on reupholstering seats since I wasn't all that sastisfied with how it turned out last time. 

I found some great suggestions from the Little Green Notebook on how to upholster corners. For the most part it worked for me, with a minor modification at the end. I removed the fabric and stapled according to her directions. 


I don't think my corners came out quite as nice as hers and I believe it's because my foam is much thicker. 


I modified my corners to accommodate my thick foam. I tucked in my fabric and folded it over almost like you're wrapping a present. This worked out pretty well for the thicker foam. When you're done stapling remember to hammer your staples in so they're not sticking up.


This is an easy update with just a little paint and new fabric. I hope to redo more chairs in the future.