Tuesday, December 30, 2014

Zebra Nightstand Makeover


I'm sorry that it's been awhile since I posted a furniture project. It's difficult to find time for projects with our crazy schedule. This ugly nightstand, I found for $20, started off as a different project. I intended to makeover this table for resale until my daughter laid claim to it midway through the project. I don't think I could have found an uglier nightstand and my husband could not understand why on earth I'd bring this thing home lol.

My original vision was to paint it off white, paint the drawers black, and stencil a chevron pattern on the top. I have never stenciled on furniture before so this was a learning experience for me. 

Wednesday, December 17, 2014

Quick & Cheap Christmas Gift Idea

Great for office parties, family gatherings or party favors for your guests!


This Christmas gift idea is inexpensive and super quick.

We did this last year for a local children's shelter and they were a hit! So, this year we made the same gifts. Mugs are easy enough to come by in dollar stores, consignment shops and yard sales. Since ours were for charity we had our mugs donated from the community.

I think it's important for my children to understand what the meaning of Christmas truly is and also learn how to help others. They have enjoyed putting these treats together and I'm sure we'll make it a yearly event.


You can add anything you want to your mugs. Since I'm filling approximately 25 mugs I try hard not to spend a fortune. I also have friends, family or co-workers who like to contribute to this cause. But what I do buy myself is Dollar Tree or Walmart. You can get Swiss Miss or Nestle hot chocolate from dollar stores, red and green plastic spoons. This year someone donated a variety of tea flavors so we added those to the mugs for the staff. Pick up a bag of candy, divide it up and wrap it up with colored plastic wrap and tie with Christmas ribbon.


I put the mugs full of treats inside a decorative Christmas treat bag. I add popcorn inside each treat bag since it's something the shelter likes to have for movie nights with the children. 


If you have suggestions on what treats you'd add please comment below! 


Saturday, December 6, 2014

Chevron Wooden Monogram Letter - Door Hanger


This is such a simple inexpensive craft to spruce up any interior or exterior door. I found this monogram letter E in a clearance bin at Michael's for just cents. It's made of MDF instead of real wood, but for this tiny project who cares?

My daughter is in love with the new craze for chevron patterns and just had to have this in pink and black to match her new Tween Zebra Room, slowly but surely "under construction". 

For this project I used a stencil I purchased from Amazon. Way easier than taping off a million zigzag lines! I got 2x 12" stencils for $6, so definitely a good deal and worth it.

I used Valspar spray paint in black and hot pink. 


I spray painted the monogram letter entirely in black. Remember to spray the edges as they will be seen. Always spray in a well ventilated area or outside.


Once fully dry position your stencil where you want it and spray your secondary color.


I bought some zebra wire ribbon at Michael's with a 50% off coupon and used a hot glue gun to glue both ends to the back of the letter. If you have a staple gun you could use that as well as long as you use a short staple, approximately 1/4 inch. Snip the ends at the top of the ribbon so you don't have a blunt straight edge. Nice!


Sunday, November 23, 2014

Turkey Cupcakes


Perfect for Thanksgiving!

These cupcakes are pretty easy to make and they'll be a hit on Thanksgiving! I ran across this recipe originally on the Betty Crocker website, which even provides a video tutorial on how to make the turkey design.

I tweeked the recipe a little. First of all I much prefer homemade frosting compared to store bought. You have much more control over the consistency of the frosting.

I have 2 Buttercream Frosting recipes I live by, that I found on Savory Sweet Life:

These frosting recipes are simple, even for a beginner, and best of all the recipe doesn't call for eggs, so no salmonella poisoning ;) I started making this frosting about a year ago and rarely use store bought any more.

I used Wiltons tip #199 to pipe my frosting on in circles until I covered the entire top, then piped a big plop of icing for the head. I used cupcake gems/pearls for the eyes. 

I did try and use some store bought frosting for the turkey's head, at first. I had orange frosting and thought it'd look really cute to have the turkey heads in orange and make it more colorful. However those 3 turkeys look slaughtered lol. The frosting ran and dripped down the cupcakes, even though I put the frosting in the fridge to stiffen it up prior to piping it on. Homemade is just better, specifically for this reason. But you could always make the Classic Vanilla Buttecream frosting and add Wiltons orange food coloring.

The kids will certainly enjoy helping to create the turkeys, so make it a family event as we did!

Tuesday, November 18, 2014

Headboard Makeover

Well, for those that don't know, after all that hard work on the twin bed for my daughter's tween zebra room we decided it was time to upgrade her to a larger bed. Next thing I know we bought her a queen size bed on sale around Labor Day. I learned afterwards from a friend - "uh yeah that's when all mattress stores have their biggest sale." Well I guess I'm a bit sheltered lol. If you're reading this, you know who you are and thanks for the tips about the linen sale in January haha. (I need to get out more)

So, new queen size mattress and no bed. Great. I bought the universal frame - easy enough - and remembered I have a queen size headboard that I had been trying to sell and could not give it away. Why? Because it's ugly and probably from 1985. This headboard came with my husband. I've always hated this headboard because it's so outdated. Guess there's a reason it never left my house lol.

This was a simple enough makeover. I had already chosen the black paint for the furniture pieces in her room (see her Tween Zebra Room colors here). I went with Valspar Satin Signature paint in shade New Black.


I added Floetrol to the paint (as directed on bottle) to reduce visible brush strokes. See these seriously awesome paint tips from Classy Clutter. 


I lightly sanded the headboard so the paint would adhere well and applied two coats of paint. I protected the new finish with a coat of polyacrylic.

Once I have all her zebra bedding I will update this post with a photo and her room reveal!


I think this really came out well and she absolutely loves her new headboard! The shelves are already lined with Beanie Boos and books!


Wednesday, October 1, 2014

Bigfoot Birthday Party

Doesn't get much funnier than that LOL

September was a crazy month and I spent more time preparing for this party, the presents and home life in general that I didn't get 1 piece of furniture completed, or even started for that matter, for the Tween Zebra Room. I promise I'll be back on that project soon!

In the meantime I wanted to share this awesome Bigfoot Birthday we managed to pull off for our 7 year old son! Normally I let them pick a theme, but this year we surprised him with Bigfoot! My son watches every single episode of Finding Bigfoot and is fascinated with the subject.

After checking Wal-Mart, Party City and online sources, I realized NO ONE sells Bigfoot party supplies. I actually found that surprising considering how popular the show is, especially here in the south. I did find some cupcake toppers on Etsy, but it was nothing any crafty woman couldn't make herself lol.

For the first time ever I had to create the entire birthday theme. I wouldn't go as far as to say it was hard, but it was definitely more work than I usually put into the decorations. This required a lot more thought, research online and Pinterest ideas. Pinterest had several pins regarding Bigfoot parties that others had put together. Some appeared rather elaborate and pricey but this mommy is on a budget.

I took all this knowledge and made a game plan for our party. The one thing I didn't see any where were parties held outside at a "campsite". Isn't that where most people see him lol? They're out camping one night, all of a sudden....you know the stories :)

So, I decided I would make my front yard a campsite and also post Bigfoot signs on nearby trees. I bought red and white checkered tablecloths for the tables and set up chairs. I don't own an actual camping tent, but I did have a beach tent...whatever works lol. Borrow a tent from someone if you need to, I promise the kids really will enjoy this outdoors theme.

Saturday, August 23, 2014

Bed Makeover

For my first project for the Tween Zebra Room I chose to do the easiest and quickest piece of furniture in the room....the bed.

BOY WAS I WRONG. How hard can it be to spray paint a metal frame?? Well if you live in South GA where it's 100% humidity most of the time, getting paint to dry is a hassle. Not to mention this time of year is so hot and the afternoon brings nasty thunderstorms that leave even more moisture in the air in its wake. SO, this wasn't the easiest and quickest project as I expected!

Here's what I started with: plain white metal frame bed.


Tuesday, August 19, 2014

ALWAYS BE BATMAN Boys Canvas Wall Art


I've seen this quote around a few times recently and thought it was hilarious. When I ran across this again as canvas wall art on Etsy I showed it to my 6 year old son, who giggled ;) I decided I would attempt to make it for him since I'm not going to spend $15-$29 for it and I had recently pinned a tutorial for adding quotes to canvas!

Friday, August 1, 2014

Our Tween Room Colors!

I am so ready to start this tween room makeover! Why am I sooo excited?? Because my daughter finally decided she's a girl!! My t-shirt and jeans wearing tomboy has changed. Now, will you find her with bows in her hair? Hahaha no way! If you could only see her facial expression if it was suggested. 

It's taken 10 years for this to come to fruition. And she wants to go all out! Even painting pink on her walls! Everyone who knows her....thinks they misheard what I said! 

I went through a lot of pink paint sample cards, with the help of good friends. We narrowed it down to 3 that I could live with on my walls and then I let my daughter make the final choice. 

The black is for her dresser and desk which I get to makeover too!


Wednesday, July 30, 2014

Mason Jar Hand Print Vases

These vases were soooo easy to make using mason jars! I ran across this idea on Pinterest right before Mother's Day and incorporated this fun craft into my Sunday School class :)

Here's the original link to Christina's Adventures who posted these adorable mason jars!
I personally think her name is quite awesome.


I've seen a lot of mason jar craft ideas and different ways to paint them. For this project however you'll want to paint the inside of the jar since little hand prints will be on the outside ;)

Monday, July 28, 2014

Tween Zebra Room

I am so excited about this room! I cannot wait to start! My daughter and I are in the planning stages. Stay tuned for updates on all the furniture makeovers and room reveal!

Sunday, July 20, 2014

Fireplace Makeover (with only paint!)


I am so happy with this fireplace makeover. Funny thing is, I wasn't planning on it. After we repainted our living room with a faux glaze and stood back and looked at how it turned out, we said uh oh. The trim paint we originally planned on would not work nor did our fireplace match the room any longer. After much debate, searching Pinterest for ideas and trial colors I FINALLY made up my mind. I wasn't about to bust through all that tile and replace it. No thank you. Not in the budget, nor do I know how. So my idea was "maybe I could paint the tile and brick!" Do people do that? Would it look stupid? I searched a little more to see if people actually did this lol. 

Turns out they do! I liked the idea of using oil based paint on the tile so it would hold up better (as was suggested by www.andthen-shesnapped.com). I read about some that used regular latex paint and ended up with scratches etc after long term use.

Tuesday, July 1, 2014

4th of July Fireplace Craft Decor


I've never been one to decorate my fireplace seasonally, but after revamping my fireplace last year, I can't help but decorate!

My kids helped me create these Quick and Easy 4th of July Crafts. I bought the cool cardboard stars from Party City for $8.99. With the help of my "mini me" we easily designed a very patriotic fireplace!

Quick and Easy 4th of July Crafts

Show your holiday spirit!


I sprayed painted an old mason jar and hand painted some white stars. I added my patriotic bling that I bought from the dollar store and voila! 


My "mini me" wanted red and white flowers from the dollar store too, so I spray painted an old flower vase so she could display patriotic flowers.


I found this idea on Pinterest and my kids LOVED creating their own flags from craft sticks! I'm not sure how the ones from this picture were created and I think we did ours a little different. I hot glued 2 small craft sticks vertically on the back to keep everything together. The kids painted all their pieces themselves and after I glued it all together they applied star stickers.


This 4th of July Patriotic Paper Chain from Love the Day is awesome! She has a free printable on her site! My "mini me" helped me create this patriotic chain in under 30 minutes. It really makes our fireplace pop!


Click here to see how I put all these crafts together to decorate our fireplace!

Tuesday, June 10, 2014

Sewing Table Makeover


I looked for a long time for a sewing table to fit my needs. The one I had was not very sturdy and cheaply made. They just don't make 'em like they used to.

I love to yard sale (duh) and ran across this sewing table on a day I wasn't even yard saling (winning!). The gentleman selling the table had it for so long, he practically gave it away! He just wanted it to go bye-bye! $20! Can you believe it?! And with the original stool too! (I have yet to redo that)

Unfortunately, as pretty as the vintage 1952 sewing machine was, it was completely inoperable. Not quite sure what I want to do with that yet.

I wanted my table to have a bolder color. I usually don't paint my furniture bold colors, I stay in the safe zone lol. I see so many beautiful, bold teals and reds on Pinterest, but honestly where would I ever put those colors in my house? But, after making a completely unanticipated boo boo with my living room faux glaze color (oh, it's orange, that's interesting) I was more open to choosing a color I normally would not.

ITEMS NEEDED:

Monday, May 26, 2014

Patriotic Windstock for Memorial Day/4th of July


Patriotic windstocks are great decorations for holidays. It's simple, cheap and easy for children!

Items I used:
1) Blue plastic cups
2) Star stickers
3) Paper streamers
4) Tape
5) Yarn or string

Apply star stickers to plastic cups, cut paper steamers to your desired length. Poke a hole in the bottom of the cup. Cut a piece of yarn and poke both ends through the hole in the cup. Pull through and tie into a big knot. Tape the paper streamers into the inside of the cup and you're done!

Sunday, May 25, 2014

Children's Art Gallery

Really cheap and easy!

I bought 2 yard sticks at Home Depot (roughly 68 cents each) and spray painted them black to match my son's bedroom furniture. I had clothes pins on hand (no idea how I acquired them lol) and spray painted them silver. I redid my son's dresser in black and silver so this matches perfectly.

I used Gorilla Glue to glue the clothes pins in place. I would recommend Super Glue instead since Gorilla Glue expands and I can actually see the glue on this. I'll be sure to use super glue when I make my daughter's.

Be sure to space your clothes pins appropriately. I just eyed it visually with a sheet of 8.5x11 paper.

Drill two small holes into each yard stick and then screw them into place using a leveler. Drilling small holes in advance prevents the wooden yard stick from splitting when screwed into the wall. Dab some matching acrylic paint over the screws and you'll never seem them!


Easy End Table Makeover


I don't have the budget to buy brand new furniture. If I can turn something outdated and cheap into something classy looking, I'll definitely do it!

I found my end table at a used furniture store a few years ago for $25. It's in great shape and worked just fine with my living room decor, until I repainted the room and changed the look completely. Now the end table seemed outdated and didn't really match. Easy fix!

Beach in a Jar!

I found this awesome idea on Pinterest courtesy of www.thefrugalgirls.com!

I have several mason jars sitting around waiting on something creative to happen to them. I also live minutes from the beach! My kids did not complain a bit when asked to find shells for this project lol. 


I spray painted the lid to the mason jar instead of gluing twine, as shown on the original post. I cut a piece of orange rope we had lying around and with the kids help, we hand picked the best shells and made our Beach in a Jar :)


Saturday, May 24, 2014

DIY Entertainment Center turned Mud Closet


I try my best to re-purpose furniture I no longer need. I enjoy creating something new out of something old :)

I had an old school entertainment center that I've owned since I was single (looooong time ago), I couldn't decide if I should just sell it or make something new. What would I make?? I saw so many cute entertainment centers turned into children's play kitchens, etc on Pinterest. My kids are really too big for that though.

I ran across tutorials about how to build your very own "mud closet". Hmmm...mud closet to finally have a place for all the book bags and shoes? And I have an entertainment center I'm not using? LIGHT BULB!

Friday, May 23, 2014

Terracotta Jewelry Tower/Stand

I originally saw this idea on Pinterest, however there was no link to find directions on how to create it. This is super easy and anyone can do it!

Two really neat things about this tower:
1) It has many different uses
2) You can create it so many different ways, just by choosing different sizes for your terracotta pots and saucers.

Items I used:
1) Terracotta pots
2) Terracotta saucers/pots
3) Glorilla Glue
4) Acrylic craft paint/paint brush
5) Sanding block (rough grit)/optional
6) Glossy spray on clear coat
7) Self-adhesive craft felt/optional

I purchased my terracotta on sale at Home Depot and bought a tube of craft paint at Michael's. I chose Gorilla Glue since it works on porous surfaces. Everything else I had on hand :)

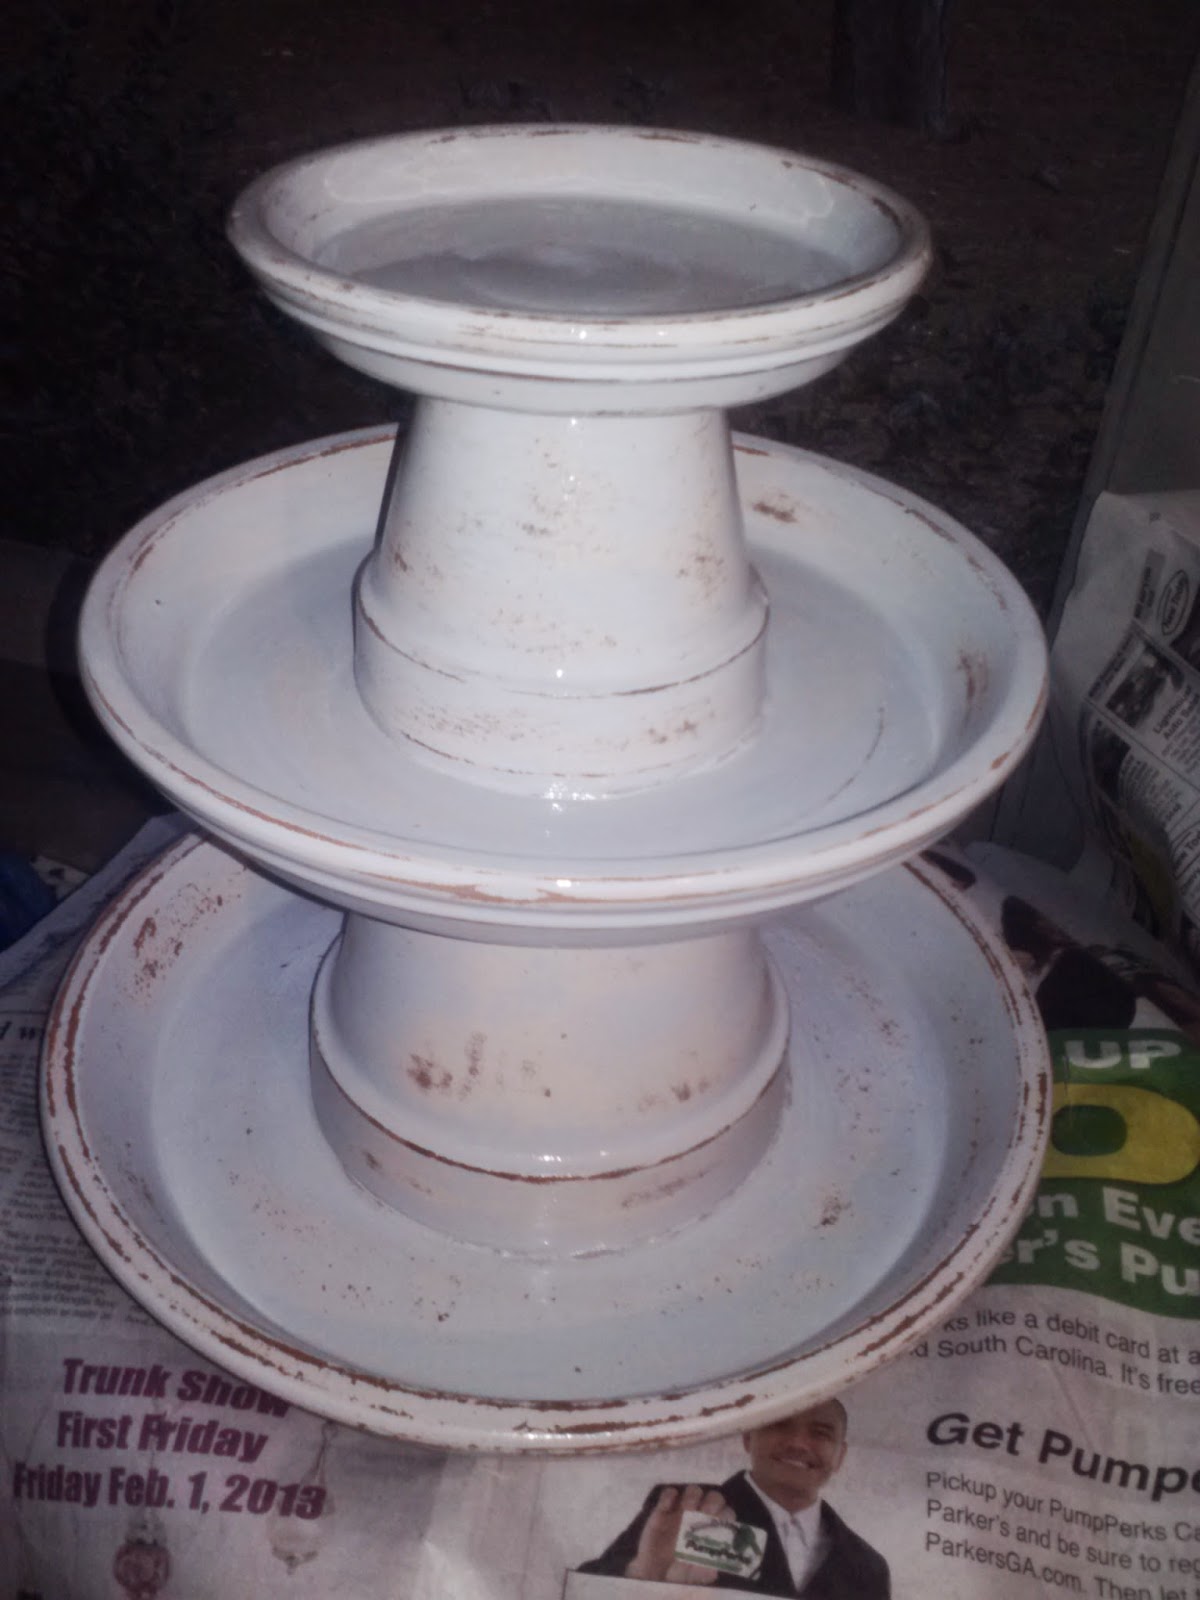
First arrange your pots and saucers to decide how you'd like the finishing product to look. Follow the glue instructions and glue all the pots and saucers together. I've since read that some others who have made these, choose not to glue all their pieces together. Whatever you prefer, be creative!

Once glue is set, paint the entire piece with the craft paint you chose. I wanted my tower to appear "antique" so I sanded edges and surfaces with a rough grit sanding block to remove a little bit of paint and add character to my piece!

To protect your tower I would definitely spray a clear coat over the entire piece. I used glossy since I already had that on hand.

Lastly, if you choose, add some self-adhesive craft felt to the bottom to prevent the tower from scratching surfaces. I definitely didn't want to scratch the paint on my new-ish "mud closet" I had just made!


As you can see, I chose to use mine for all my husband's junk lol. I keep this right at the front door so he can deposit all his belongings ;)

Welcome to Coastal Mom Creations!